In 2024, the video generation AI landscape is experiencing a transformative shift with the rise of cutting-edge technologies like OpenAI’s Sora, Luma AI, and Runway Gen-3, which are captivating creators. Amid this wave, a new player is quietly making its mark: “Vidu Studio.”
This article will provide a comprehensive guide to Vidu Studio, covering its usage, pricing structure, and commercial potential. We aim to showcase the full appeal of this tool, which may well outshine even Sora.
What is Vidu Studio?
Vidu Studio, developed by Shengshu Technology, is a Chinese AI tool for video generation that creates videos from text or images. It can produce videos ranging from 4 to 8 seconds in length and supports resolutions up to 1080P. Users can access it by registering with an email address.
Similar to the American tool “Sora,” Vidu Studio can generate videos up to 16 seconds long and has been gaining attention since its introduction at the Zhongguancun Forum in 2024.
After three months of enhancements, Vidu Studio has retained its core features while adding new capabilities, such as improved character consistency and animation-style generation. Notably, the tool’s inference speed has been accelerated, allowing for the creation of a 4-second video in just 30 seconds.
What Can We Do with Vidu Studio?
The main features of Vidu Studio are as follows:
- Text to Video: Generate videos from text descriptions
- Image to Video: Create videos based on still images
- Animation Style: Not only realistic videos but also animation-style videos can be generated
- Character Reference: Video generation based on specific characters is possible
What is particularly noteworthy is the animation style and character reference functions. These features are unique and not commonly seen in other video generation AIs, and they are the strengths of Vidu Studio.
For example, using the animation style, you can easily create videos with an atmosphere similar to hand-drawn animations. This opens up great possibilities for the production of explanatory videos or promotional images. Here is an actual conversion example.
Also, by using the character reference function, you can generate videos based on specific characters or people. This makes it possible to create videos using brand characters or videos that seem to employ celebrities.
The video generation capability of Vidu Studio is highly regarded, especially for the accuracy of Text to Video. The ability to accurately understand the content of the text input by the user and visually express it is not inferior to other video generation AIs.
What is the Pricing Plan of Vidu Studio?
The pricing system of Vidu Studio is designed to meet the needs of users. Basic use is possible for free, but a paid plan is required for more advanced features or commercial use.
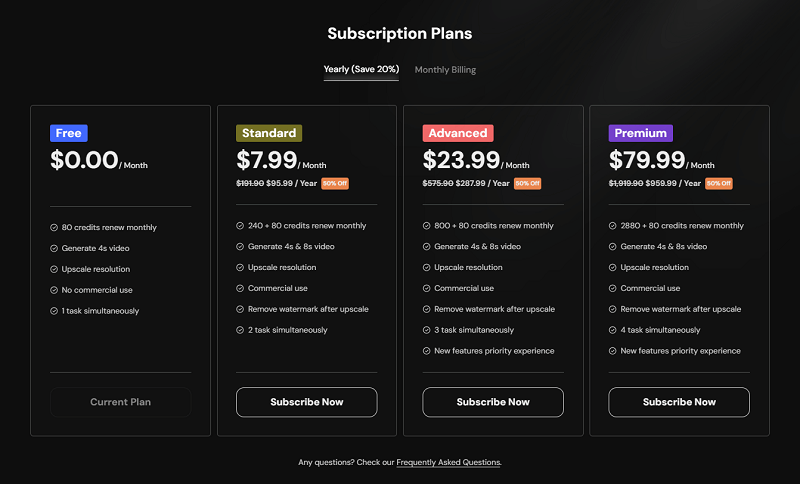
Free Plan:
- 80 credits renew monthly and consumes 4 credits for 4-second video generation,
- A total of 20 videos can be generated for free
- Commercial use is not allowed
Paid Plan (Standard and above):
- Longer video generation (up to 8 seconds) is possible
- Commercial use is possible
- Provides more credits (320 credits, 880 credits o 2960 credits)
If you are considering commercial use, you need to choose a paid plan of Standard or higher. This will allow you to use the videos generated by Vidu Studio for business or monetized projects.
When considering the use of Vidu Studio, it is important to choose the appropriate plan according to your own needs and budget. It is also recommended to first try the free plan and then upgrade to a paid plan as necessary.
How to Register for Vidu Studio
To start using Vidu Studio, you need to register first. The registration process is very simple and can be completed in a few minutes. Here, we explain the registration method step by step.
Step 1: Access the official website
Step 2: Click the ‘Try Vidu’ button
Step 3: Select the account creation method
- Registration with Google account
- Registration with Email
- Registration with Phone (only availiable for chinese users)
Step 4: Check the Terms of Service and Privacy Policy
Once the registration is complete, you can immediately start using the features of Vidu Studio. Although the free plan allows for a limited number of video generations, it is sufficient to try the basic functions of the service. Also, the language is only supported in Chinese or English.
As a note, if you are considering commercial use, it is important to check whether the plan you selected during registration is available for commercial use. Since the free plan does not allow commercial use, if you are planning to use it for business purposes, you need to consider upgrading to a paid plan.
Also, the email address used for registration will be used to receive important announcements from Vidu Studio and information about the account. It is recommended to check it regularly.
How to Use Vidu Studio to Create Video
Vidu Studio is an easy-to-use video generation AI tool that combines an intuitive interface with powerful features. Here, we will explain in detail how to use the basic functions of Vidu Studio for each main feature.
Quick guide: How to Create a Free Hug Video with Artificial Intelligence
Generate Video from Text to Video with Vidu Studio
The Text to Video feature is one of the core features of Vidu Studio. AI understands the description in text and visualizes it to generate a video. Here is a detailed explanation of how to use Text to Video.
Step 1: Input the prompt
Enter a detailed description of the video you want to generate in the text box. If you are stuck for ideas, click the ‘Inspire me’ button, and the AI will automatically provide examples of prompts. This helps to get creative ideas. You can also check Vidu Prompt Guidance for more informations.
I tried entering “A little boy is dancing under rainy day and wearing a yellow raincoat.”
Step 2: Adjust the parameters
Set the basic parameters such as the length, frame rate, and resolution of the video. It is possible to set up to 4 seconds for the free plan and up to 8 seconds for the paid plan.
Step 3: Press the following button
You can extend it by selecting 8 seconds. (Only possible with the paid plan)
Step 4: Style selection
Choose between ‘General’ or ‘Animation’ styles. General generates realistic videos, and Animation generates animation-style videos.
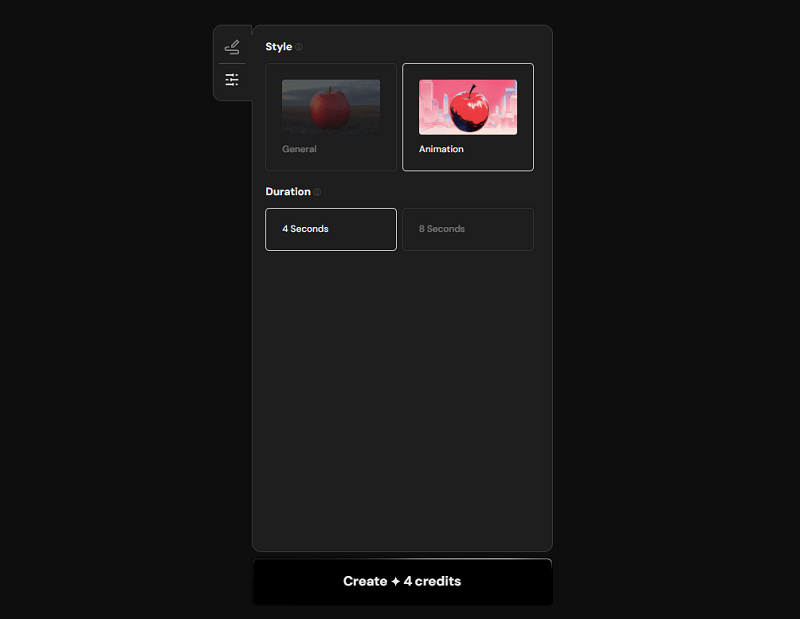
General style:
- Generates realistic and natural videos.
- Recreates the texture and movement similar to live-action videos.
- Suitable for product demos, landscape descriptions, scenes with characters, etc.
Animation style:
- Generates animation-style videos
- Recreates the texture and movement similar to hand-drawn animations.
- Suitable for explanatory videos, content using characters, visualizing abstract concepts, etc.
Step 5: Start generation
Once all settings are complete, click the ‘Create’ button to start video generation. It’s like a movie animation!
The choice of style varies depending on the purpose or use of the video you are generating. For example, if you are creating a promotional video for a company, the General style may be suitable to show the actual appearance of the product or service. On the other hand, if you are creating educational content to explain complex concepts, the Animation style may be more effective.
Create Video from Image to Video with Vidu Studio
Vidu Studio’s Image to Video feature is a powerful tool that converts still images into videos. By using this feature, you can add movement to existing images or create new video scenes based on images. Here is a detailed explanation of how to use the Image to Video feature.
Step 1: Upload the image
Click the ‘Upload Image’ button and upload the image you want to convert. Please use supported image formats (JPG, PNG, GIF, etc.). I try it using an image of the movie “Brooklyn”.
Step 2: Input the prompt
Based on the uploaded image, enter a prompt that describes what kind of movement or change you want to add.
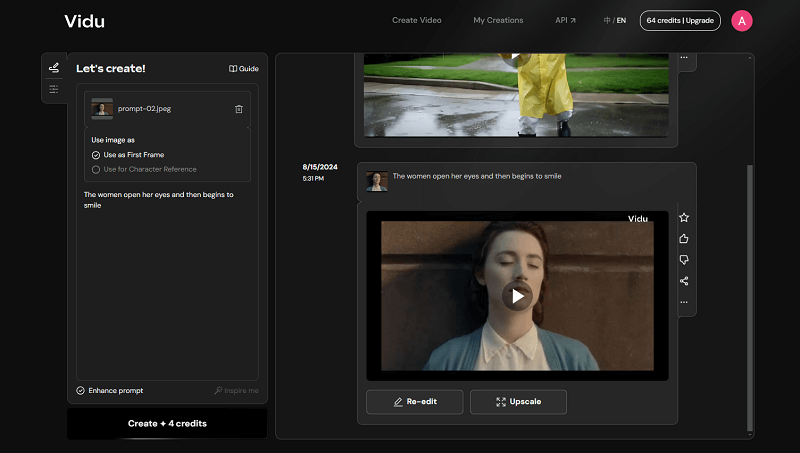
I tried entering “The women opens her eyes and then begins to smile.”
It’s incredibly realistic and natural, isn’t it!
Note: The Image to Video feature cannot be used for animations.
The Image to Video feature is a powerful tool that breathes new life into still images. It can be used for various purposes such as marketing materials, social media content, art pieces, etc. Mastering this feature will greatly expand the range of creative expression.
Vidu Studio VS KLING: Which is Better?
The video generation AI market is rapidly evolving, and in addition to Vidu Studio, there are also platforms such as KLING that is attracting attention. Here, we compare Vidu Studio with KLING, both are developed by chinese companies, analyzing their features and strengths.
| Feature/Capability | Vidu Studio | KLING |
|---|---|---|
| Developed by | Shengshu Technology | Kuaishou (Beijing-based TikTok competitor) |
| Release Date | Announced on April 27, 2024, publicly accessible since July 2024 | Publicly accessible since July 2024 |
| Model Architecture | Uses Universal Vision Transformer (U-ViT), combines Diffusion and Transformer technologies to simulate realistic environments and maintain temporal consistency. | Features a diffusion-based transformer model, 3D spatiotemporal joint attention mechanism, and a 3D variational autoencoder (VAE) for efficient video generation, realistic motion dynamics, and high-quality video compression and reconstruction. |
| Website | Vidu Studio | KLING AI |
| Video Length (Free/Paid) | 4 seconds (free), 8 seconds (paid) | 5 seconds (free), 10 seconds (paid) |
| Resolution | Lower resolution for free version, higher resolution available | Lower resolution for free version, higher resolution available |
| Text-to-Video Generation | Can create high-definition videos from text and image inputs in both Chinese and English, produces up to 16-second clips in anime and realistic styles with realistic lighting and facial expressions. | Creates videos from text and image inputs, offers advanced physics-based motion modeling for realistic movements, excels in text-to-video generation, particularly in understanding physics and executing complex motions. |
| Image-to-Video Generation | Allows users to upload images as the foundation for video creations, enabling the animation of characters or scenes. | Offers the capability to generate videos from existing images, bringing static visuals to life by incorporating dynamic elements such as smoke, reflections, and other captivating visual effects. |
| Video Generation Speed | Faster generation time, completed in under a minute for a 4-second clip at 688 × 384 pixels resolution. | Capped at five seconds in length, sometimes suffers from blurriness and graininess, particularly at lower resolutions. |
| User Interface | Easy to use, allows adjustment of video style between “general” and “animation” options, and video duration for paid subscribers. | Customizable output settings including creativity level, mode, video length, and frame ratio. |
| Limitations and Areas for Improvement | AI model sometimes struggles to maintain coherence between the original prompt and the generated content. | Notable limitations include blurriness and graininess in output videos, and sometimes fails to fully adhere to prompt requests, highlighting room for improvement in the model’s ability to accurately interpret and execute user input. |
| Key Takeaways | Excels in quick generation and anime-style content. | Focuses on realistic physics simulation and detailed motion. |
Conclusion
In conclusion, Vidu Studio can be said to be one of the most user-friendly and immediate video generation AI tools for general users or marketing managers. However, technological progress is rapid, and the functions and performance of each platform may continue to change in the future, so continuous evaluation and comparison are necessary.